9-12 2,086 views
ActiveMQ是一款基于Java的开源消息服务器产品,因此,我们可以将其集成到通过Java实现的业务系统中。下面将对集成方法做一个简单的总结。
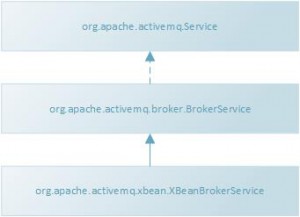
首先,我们看一下ActiveMQ中的部分核心类:

org.apache.activemq.Service是ActiveMQ中的一个接口,定义了start和stop方法。org.apache.activemq.broker.BrokerService是ActiveMQ中的核心类,其实现自Service接口,用于对外提供消息服务。org.apache.activemq.broker.XBeanBrokerService是BrokerService的一个子类,XBeanBrokerService实例可以通过xbean xml配置文件生成。ActiveMQ作为单独服务启动时,其配置文件activemq.xml就是xbean xml格式的,启动后生成的就是一个XBeanBrokerService实例。
1.通过VM协议实现集成:
客户端连接ActiveMQ消息服务器时,可以使用多种协议(TCP、VM、STOMP等),其中VM协议是指客户端会从当前JVM中查找ActiveMQ消息服务器实例,若查找到,则与其建立连接,若查找不到,则自动创建ActiveMQ消息服务器实例。如果客户端和服务器端都在一个JVM中,则可以通过VM协议实现ActiveMQ消息服务器的自动创建、与业务系统的集成。
2.直接创建BrokerService实例:
|
1 2 3 4 5 6 7 8 9 10 11 12 13 14 15 16 17 18 19 |
public static void main(String[] args)throws Exception { BrokerService broker = new BrokerService(); broker.setBrokerName("myBroker"); broker.setDataDirectory("data/"); SimpleAuthenticationPlugin authentication = newSimpleAuthenticationPlugin(); List<AuthenticationUser> users = newArrayList<AuthenticationUser>(); users.add(new AuthenticationUser("admin","password", "admins,publishers,consumers")); users.add(new AuthenticationUser("publisher","password", "publishers,consumers")); users.add(new AuthenticationUser("consumer","password", "consumers")); users.add(new AuthenticationUser("guest","password", "guests")); authentication.setUsers(users); broker.setPlugins(new BrokerPlugin[]{authentication}); broker.addConnector("tcp://localhost:61616"); broker.start(); System.out.println(); System.out.println("Press any key to stop the broker"); System.out.println(); System.in.read(); } |
3.使用工厂方法创建BrokerService实例:
|
1 2 3 4 5 6 7 8 9 10 11 |
public static void main(String[] args)throws Exception { System.setProperty("activemq.base",System.getProperty("user.dir")); String configUri ="xbean:activemq.xml" URI brokerUri = new URI(configUri); BrokerService broker = BrokerFactory.createBroker(brokerUri); broker.start(); System.out.println(); System.out.println("Press any key to stop the broker"); System.out.println(); System.in.read(); } |
4.通过Spring配置直接创建BrokerService实例
|
1 2 3 4 5 6 7 8 9 10 11 12 13 14 15 16 17 18 19 20 |
<bean id="simpleAuthPlugin" class="org.apache.activemq.security.SimpleAuthenticationPlugin"> <property name="users"> <util:list> <ref bean="admins" > <ref bean="publishers" > <ref bean="consumers" > <ref bean="guests" > </util:list> </property> </bean> <bean id="broker" class="org.apache.activemq.broker.BrokerService" init-method="start"destroy-method="stop"> <property name="brokerName"value="myBroker" > <property name="persistent"value="false" > <property name="transportConnectorURIs"> <list><value>tcp://localhost:61616</value></list> </property> <property name="plugins"> <list><ref bean="simpleAuthPlugin"/></list> </property> </bean> |
5.通过Spring配置使用BrokerFactoryBean创建BrokerService实例:
|
1 2 3 4 |
<bean id="broker" class="org.apache.activemq.xbean.BrokerFactoryBean"> <property name="config" value="classpath:activemq.xml"> <property name="start"value="true" /> </bean> |